|
STEP ONE
Pick the style of pattern you want to make.
If this is your first time making a pattern, it would be best to go with something simple that uses simple shapes that you can easily repeat. Once you have decided on the design, you would need to make the elements that will appear in your pattern.
For this example we will be making a floral pattern.
STEP TWO
You would need to make the graphic elements that will appear in your pattern. For this tutorial, we have made some simple flowers and leaves that we will repeat in our pattern. At this point, you would also pick your color scheme.
The elements can be made in Illustrator or any other vector-based editing software you have. You could also draw your design and scan it in. You just need to make sure they are vector files. This is to preserve the image quality when you are scaling it.
STEP THREE
Now that you have the elements ready. You would need to set up your file. Most patterns usually start off as squares, but you can also make a rectangular design; it all depends on how you want the pattern to look.
Open a new document. The document size isn't very important but it should be larger than your pattern. You just need enough space to work within. We will be making a square pattern so our document will be a square.
Now you would need to make a square with the rectangle tool. Click anywhere on your document to make the size option window appear. We will be making a 300x300 pixel square.
The dimensions of our square will tell us where to place the elements that bleed out. In this case, we know our square is 300x300 pixels, so we would either be moving the elements 300 pixels horizontally or vertically. This will keep everything lined up and make your pattern seamless.
After you square has been made go into the layers window and lock the layer that the square is in. This is to prevent anything from shifting that could affect the pattern.
STEP FOUR
Now that you have set up your file, you can begin placing your elements on the edges. To make things simple, only place the elements on the left or top edge. When you have placed one element on the edge, you will need to duplicate the same element over to the opposite edge.
We will put a flower that goes over the top edge and then duplicate it to the bottom edge. Once the flower is positioned on the top edge, right click the flower and go to transform -> move (CMD+SHIFT+M or CTRL+SHIFT+M). The move window will appear and you can precisely move your flower to the bottom edge. Make sure the preview option is checked off, so you can see if it is going to the correct place.
Since we are moving up and down, you will keep horizontal at 0px. We know our box is 300px, so we will need to change the vertical dimension to 300px. You should see your vector move down. If it has moved to the right spot click copy and the element will be copied and moved over.
Now place an element on the left edge, right click it and go to transform -> move. You will keep vertical at 0px but horizontal should be 300px. Remember to click copy so that your element is duplicated and moves over. If you do not click copy it will only move your element.
After you have placed the elements you want on the edge. You can do almost anything to the center as long as it doesn't bleed over the edge. If it does, you will have to duplicate it to the opposite side to insure it stays seamless.
STEP FIVE
Your pattern is now complete. If you are happy with it then the next step is to turn it into a pattern swatch. You can use the swatch to fill in shapes with your pattern. You will also need to do this in order to test if your pattern is seamless.
You can choose to remove the square so you can have a transparent background, this will allow you to use any background color you want, or you can leave it as it is. In our case, we want our pattern to have a transparent background. We won't be deleting our square completely, because we need to tell Illustrator where to cut off the elements that bleed off the edges.
To do this, you need to unlock the layer that your square is in, select it your square, and remove the fill and stroke. Everything inside the square will remain, and everything outside of it will be cut out. Select all your elements (including the square), and go to the edit menu and click on "define pattern". Name your pattern and hit OK. Your new pattern will now appear as a swatch. You can use the swatch to fill in shapes to see how your pattern turned out!
If you noticed a thin line going through your pattern. It is completely normal. This is how Illustrator renders the graphic. If you zoom in and out and it disappears then it is good to go. If it doesn't then you would need to go back and make sure the elements that were outside of the box are the exact distance from each other.
|

Graphic elements that will be used.
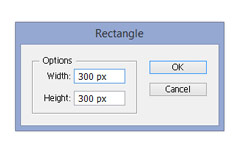
Make a square with the rectangle tool.
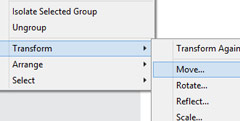
After you place your element, right click and go to transform -> move
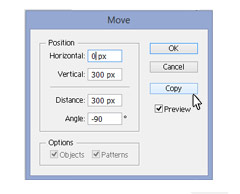
The move window will help you position your elements.
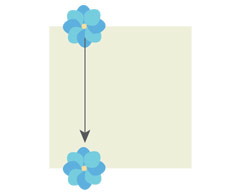
Your element should move exactly 300 pixels down (or whatever the height of your square is).

After you have placed all the elements around the edge you can arrange the center however you want.
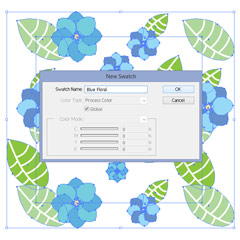
Select all your elements and go to edit -> define pattern.

Your pattern is now ready to use!.
|

