| HOW TO INSTALL A SECURE-T HANGING SYSTEM FOR METAL FRAMES
|
 |
|
There are numerous safety and security hanging systems available on the market. Protecting your art from tremors, rambunctious children, and theft, T-screw hangers, also known as T-lock hangers, are a simple security hanging hardware that will keep your artwork from falling off the wall. It will deter theft, though it is not strong enough to absolutely prevent it.
This article provides instructions on how to install a T-screw hanging system at home. |
Summary
| Tools |
Hardware |
Steps |
- Drill
- Measuring tape
- Level
- Pliers
|
- Brackets
- T-screw
- Screws
- Special wrench
|
- Mount brackets
- Level brackets
- Affix T-screw
- Mount frame and lock T-screw
|
|
| Hardware
|
|
|
Your secure-T hanging system should come with the following hardware. The quantity will vary depending on the size of your frame.
|

|
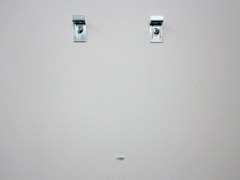
| Step 1. Mount Brackets onto Wall
|
|
|
Mount the first bracket onto the wall to determine the height of the frame. Mount the second bracket onto the wall at the same height as the first bracket. |
 |
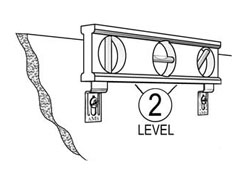
| Step 2. Level Brackets
|
|
|
Use a level to check the alignment of the brackets. If it is not aligned, adjust accordingly. |
 |
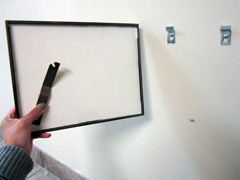
| Step 3. Affix the T-screw onto the Wall
|
|
|
To determine the placement of your T-screw, hook your metal frame onto the brackets. Mark where the bottom of your frame sits on the wall. Then measure the thickness of the back of the frame. Your T-screw should sit in the middle of the groove of the alumnium frame. Then, height X (the middle point) is half the thickness of the back of the frame.
The T-Screw should be centered in between the two brackets.
Using a drill bit adapter, screw your T-screw into the wall. If you do not have a drill bit adapter, you may use pliers.
If the T-screw is too high, simply twist the screw clockwise into the wall. If the T-screw is too low, untwist the screw counterclockwise so your frame sits evenly when it is mounted onto the wall.
Leave the T-Screw parallel to the slot in which it will sit.
|
 |
 |
|
| Step 4. Mount Frame and Rotate T-Screw 90 Deg Clockwise
|
|
|
You will now rotate your T-screw from the horizontal to the vertical position by turning the wrench 90 degrees clockwise.
Before mounting your frame onto the wall, practice turning the T-screw with the special wrench. Don't forget to rotate it back after you have practiced! Then, hook your frame onto the brackets at the top and push the bottom of the frame onto the T-screw. If your frame is aligned with the hardware on the wall, it should slot smoothly into place.
With your frame in place, slide the wrench behind the frame to rotate the T-screw. You frame should now be securely fastened in place. Test your handiwork by very gently pulling the frame from the wall. If your frame shifts, make adjustments as necessary.
|
 |
 |

|
| Purchasing Secure-T Screws
|
|
|
If you have any questions about our products or services, do not hesitate to contact us. Our knowledgeable staff are always happy to offer advice or suggestions for your next decor project or exhibit.
|
|
© 2002-2026 - KeenART Media Ltd.
|
|
| |
|